
| DIYer: | frenzy |
|---|---|
| 制作时间: | 2小时 |
| 制作难度: | ★★★☆☆ |
| GEEK指数: | ★★★★☆ |
Arduino,是一块基于开放源代码的USB接口Simple I/O接口板,或者可以诠释为一种开源硬件和开源软件相结合的创新,它能实现的功能相当丰富。在此之前的文章中,已经有不少利用Arduino实现的DIY作品,为使童鞋们能循序渐进的加深了解,我将介绍一些Arduino的基本应用。
首先要介绍的是如何利用Arduino板发出简单的声音,即如何把Arduino板做成一个迷你的音频发生器。
1 工具和材料
○ 1个8欧姆的小扬声器;
○ 1块Arduino实验板;
○ 1个按钮;
○ 1个阻值10k的电阻
○ 以及导线若干。
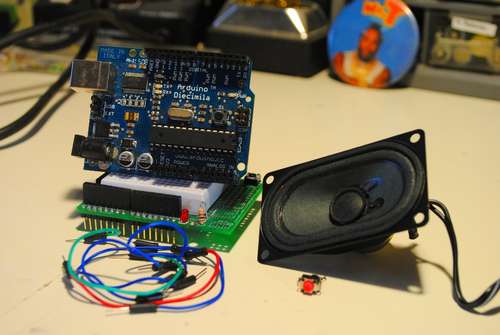
这里我用一块Adafruit ProtoShield原型扩展板来搭建测试电路
2 如何产生音乐
● 在开始动手制作之前,我们最好先提前运行一下音乐程序,这样对搭建出的Arduino电路应该发出什么音乐就能做到心中有数。你可以从Arduino集成开发环境中获得相应的音乐程序。
● 为方便起见我在这里直接给出了一段音乐程序代码(都是基础的C语言,别有压力!)。
#include "pitches.h"
// notes in the melody:
int melody[] = {
NOTE_C4, NOTE_G3,NOTE_G3, NOTE_A3, NOTE_G3,0, NOTE_B3, NOTE_C4};
// note durations: 4 = quarter note, 8 = eighth note, etc.:
int noteDurations[] = {
4, 8, 8, 4,4,4,4,4 };
void setup() {
// iterate over the notes of the melody:
for (int thisNote = 0; thisNote
// to calculate the note duration, take one second
// divided by the note type.
//e.g. quarter note = 1000 / 4, eighth note = 1000/8, etc.
int noteDuration = 1000/noteDurations[thisNote];
tone(8, melody[thisNote],noteDuration);
// to distinguish the notes, set a minimum time between them.
// the note's duration + 30% seems to work well:
int pauseBetweenNotes = noteDuration * 1.30;
delay(pauseBetweenNotes);
// stop the tone playing:
noTone(8);
}
}
void loop() {
// no need to repeat the melody.
}
}
● 另外还需要一个文件来定义基本音调,这个文件也能在集成开发环境中找到,在此我也给出了这段代码,你只需将其保存为.h格式,并放到程序目录下即可:
/***************** Public Constants ********************/
#define NOTE_B0 31
#define NOTE_C1 33
#define NOTE_CS1 35
#define NOTE_D1 37
#define NOTE_DS1 39
#define NOTE_E1 41
#define NOTE_F1 44
#define NOTE_FS1 46
#define NOTE_G1 49
#define NOTE_GS1 52
#define NOTE_A1 55
#define NOTE_AS1 58
#define NOTE_B1 62
#define NOTE_C2 65
#define NOTE_CS2 69
#define NOTE_D2 73
#define NOTE_DS2 78
#define NOTE_E2 82
#define NOTE_F2 87
#define NOTE_FS2 93
#define NOTE_G2 98
#define NOTE_GS2 104
#define NOTE_A2 110
#define NOTE_AS2 117
#define NOTE_B2 123
#define NOTE_C3 131
#define NOTE_CS3 139
#define NOTE_D3 147
#define NOTE_DS3 156
#define NOTE_E3 165
#define NOTE_F3 175
#define NOTE_FS3 185
#define NOTE_G3 196
#define NOTE_GS3 208
#define NOTE_A3 220
#define NOTE_AS3 233
#define NOTE_B3 247
#define NOTE_C4 262
#define NOTE_CS4 277
#define NOTE_D4 294
#define NOTE_DS4 311
#define NOTE_E4 330
#define NOTE_F4 349
#define NOTE_FS4 370
#define NOTE_G4 392
#define NOTE_GS4 415
#define NOTE_A4 440
#define NOTE_AS4 466
#define NOTE_B4 494
#define NOTE_C5 523
#define NOTE_CS5 554
#define NOTE_D5 587
#define NOTE_DS5 622
#define NOTE_E5 659
#define NOTE_F5 698
#define NOTE_FS5 740
#define NOTE_G5 784
#define NOTE_GS5 831
#define NOTE_A5 880
#define NOTE_AS5 932
#define NOTE_B5 988
#define NOTE_C6 1047
#define NOTE_CS6 1109
#define NOTE_D6 1175
#define NOTE_DS6 1245
#define NOTE_E6 1319
#define NOTE_F6 1397
#define NOTE_FS6 1480
#define NOTE_G6 1568
#define NOTE_GS6 1661
#define NOTE_A6 1760
#define NOTE_AS6 1865
#define NOTE_B6 1976
#define NOTE_C7 2093
#define NOTE_CS7 2217
#define NOTE_D7 2349
#define NOTE_DS7 2489
#define NOTE_E7 2637
#define NOTE_F7 2794
#define NOTE_FS7 2960
#define NOTE_G7 3136
#define NOTE_GS7 3322
#define NOTE_A7 3520
#define NOTE_AS7 3729
#define NOTE_B7 3951
#define NOTE_C8 4186
#define NOTE_CS8 4435
#define NOTE_D8 4699
#define NOTE_DS8 4978
● 按照上图所示连接扬声器并烧入程序,电源正极连接8脚,负极连接接地脚,不出意外的话,这样就能听到一小段曲子了。
● 如果想尝试换成其他音乐,还可以从 这里 下载相应代码。
3 Tone函数
● Arduino板上产生的音乐由tone()函数控制,改动该函数即可改变音乐旋律,代码有两种形式分别为:tone(pin, frequency, duration)或tone(pin, frequency)
● 第一个函数中,pin代表连接扬声器的管脚,frequency代表发声频率,duration代表持续的时间,单位是毫秒。
● 如果用第二个函数,则还需另外的noTone()函数来控制音乐的停止noTone(pin)。
● 在上一步音乐程序中,还需包括一个pitches.h文件。该文件的作用是根据声音频率改变自动得出相应变量,这样我们就无需自己计算基本音调,有了这个功能,我们这些菜鸟级的作曲家也有机会推出自己的作品了。
4 制作简易键盘
● 接下来我们要制作一个简易的单键键盘,这一步工作主要是把电路各个部分组合起来,并使其在按键控制下正常发声。
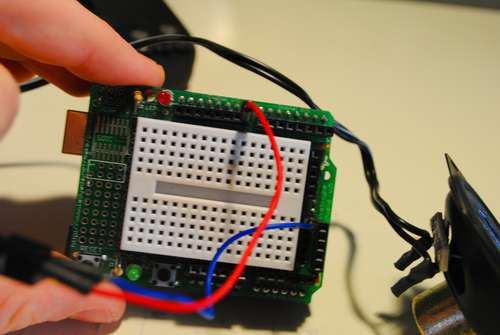
● 下面两张图片分别是实际接线图和接线示意图。

实际接线图
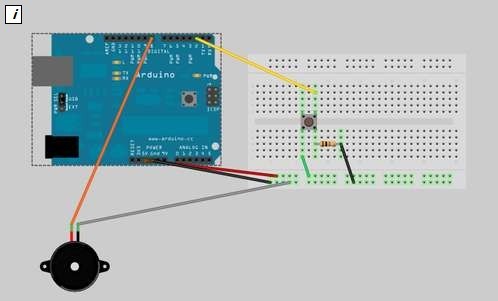
接线示意图
● 下面是单个音调的程序代码,将其添加到tone函数中,另外千万不要忘记pitches.h文件哦(除非哪位蛋疼哥想亲自动手把赫兹换算成音调):
#include "pitches.h"
const int buttonPin = 2; // the number of the pushbutton pin
int note1 = NOTE_C4; // define note sound
// variables will change:
int buttonState = 0; // variable for reading the pushbutton status
void setup() {
// initialize the pushbutton pin as an input:
pinMode(buttonPin, INPUT);
}
void loop(){
// read the state of the pushbutton value:
buttonState = digitalRead(buttonPin);
// check if the pushbutton is pressed.
// if it is, the buttonState is HIGH:
if (buttonState == HIGH) {
// sound tone
tone(8, note1);
}
else {
//turn off sound
noTone(8);
}
}
● 连接好电路并载入上面这段代码,按下按键后听到的声音应该是C调。下面我们再来看段视频以进一步加深理解:
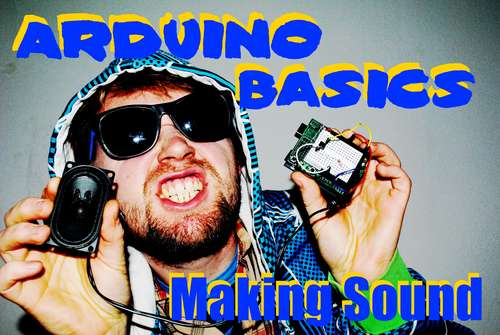
5 震撼出笼!

● 作品揭晓的时刻到啦!看爱出镜的作者自HIGH的摸样是不是很有感染力?!

● 如果你觉得音调不够丰富,想添加更多音调,那么只需继续增加按键和相应代码。

● 让我们来期待更多的arduino基本应用吧!
6 DIYer签到处
如果哪位童鞋能为arduino板DIY出一套全键盘,那不妨贴图上来共同分享哈!
| 编辑: | Luna3.0 |
|---|
果壳DIY站QQ群: 132647923 (加入时请报上你在果壳的个人主页地址,以防广告ID)
果壳DIY站微博: http://t.sina.com.cn/guokrdiy